How to restore a classic automobile is a journey that blends history, engineering, craftsmanship, and personal storytelling, inviting you to uncover the character behind every vintage curve and chrome detail. This beginner’s guide to car restoration helps you approach projects with a clear plan, a realistic budget, defined goals, and a safety-first mindset that protects you while you learn. By following the restoration steps for classic cars, you can methodically assess condition, prioritize tasks, and gradually transform rusted metal, brittle trim, and tired interiors into a reliable showpiece ready for the road. From evaluating bodywork restoration and repair needs to applying engine and mechanical restoration tips, a thoughtful practice of classic car restoration guides every informed choice—from panel gaps to torque specs—shapes the lasting quality of your build. With patience, discipline, and hands-on curiosity, you’ll gain skills that carry into future projects, deepen your appreciation for automotive history, and enjoy the process as much as the finished car.
Beyond the headline goals, think of reviving a vintage vehicle through a holistic process that respects its engineering and era. That means approaching the project as a heritage refurbishment, where mechanical systems, electrical wiring, and interior details are brought back to their former function and feel. In Latent Semantic Indexing terms, you’ll encounter topics like vintage auto restoration, period-appropriate finishes, and drivetrain refurbishment, all contributing to a cohesive, authentic result. By framing the work as a layered upgrade—mechanics first, then body and aesthetics—you align practical steps with the historical character of the car. This mindset helps you plan effectively, source compatible parts, and communicate clearly with suppliers and mentors as you progress.
How to Restore a Classic Automobile — A Practical Guide for Beginners
Embarking on a classic car restoration is a rewarding journey that blends history, engineering, and artistry. For beginners, understanding where to start helps transform a dusty relic into a reliable showpiece or a cruisable daily driver. This Descriptive guide emphasizes planning, budgeting, and meticulous documentation as the foundation of any successful project, aligning with the broader themes of classic car restoration and serving as a beginner’s guide to car restoration.
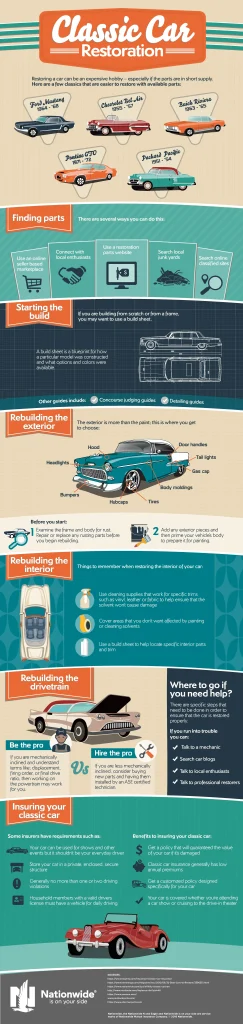
A central pillar of the novice path is defining goals and budgeting before turning a wrench. By framing whether the outcome is concours-quality, a practical driver, or a weekend showpiece, you set the scope, parts strategy, and how much labor you’ll perform versus hire out. This aligns with restoration steps for classic cars and helps prevent scope creep and spiraling costs. Begin a realistic budget that accounts for parts, fluids, paints, tools, and potential labor, plus a contingency fund for hidden rust, rust repair, or frame work.
Creating a workspace that supports safe, precise work is essential. Invest in proper ventilation, lighting, and safety gear while assembling a core set of tools—wrenches, torque wrenches, pliers, a multimeter, jacks, stands, and a dependable compressor. This initial setup relates to bodywork restoration and repair practices as you’ll likely encounter rust removal, metal finishing, and paint prep at later stages. A well-organized shop cultivates confidence as you learn how to restore a classic automobile and progress through the restoration steps for classic cars.
Mastering the Restoration Process: From Planning to Show-Worthy Finish
With goals set and a plan in place, the journey progresses through methodical phases. Start with disassembly, labeling, and thorough documentation, which form the bedrock of a smooth reassembly. Photograph every angle, label wiring and fasteners, and maintain a parts map to support both the engine and mechanical restoration tips and the broader restoration process. This phase mirrors the beginner’s guide to car restoration by prioritizing organization and clear records, ensuring fewer missteps as you work through the restoration steps for classic cars.
Next, attention turns to the core mechanical and bodywork tasks. Engine and mechanical restoration tips come into play as you assess the powertrain, cooling, fuel, ignition, and exhaust systems, deciding whether to rebuild, replace, or source period-correct components. In parallel, bodywork and paint—rust repair, panel replacement, filler, sanding, and priming—bring the exterior back to life. Emphasizing bodywork restoration and repair keeps the build looking authentic while maintaining structural integrity. This stage embodies the practical synthesis of planning, skill-building, and careful execution central to classic car restoration.
The culmination involves electrical, interior, and reassembly work, followed by testing and alignment. Reconnect wiring, install interior components, and perform controlled test runs to verify safety and performance. Documentation continues to pay dividends during this phase, supporting long-term maintenance and potential future upgrades. By integrating maintenance and care into the finish, you extend the value and enjoyment of the restored vehicle, fulfilling the goals set at the project’s outset and underscoring the enduring lessons from classic car restoration.
Frequently Asked Questions
How to restore a classic automobile: what are the essential steps for a beginner’s guide to car restoration?
Embarking on a classic car restoration starts with clear goals and a realistic budget. Define whether you want a concours-quality show car, a dependable daily driver, or a weekend cruiser. Then research and plan: gather factory manuals, service sheets, and restoration precedents; outline phases (disassembly, mechanical, bodywork, paint, interior, reassembly) and document everything with photos. Build a safe, well-equipped workspace, and label parts during careful disassembly. In the mechanical phase, assess engine, brakes, and drivetrain; decide whether to rebuild or source a period-correct component. Move to bodywork and paint with rust assessment, patching, priming, and era-appropriate color. Reassemble, test, and align, followed by ongoing maintenance. Finally, anticipate common pitfalls like timelines slipping, budget creep, and parts availability, and build contingency time and funds into your plan.
What engine and mechanical restoration tips and bodywork restoration and repair considerations should I know for a classic car restoration project?
Key engine and mechanical restoration tips include a thorough assessment of the engine, cooling, fuel, ignition, and exhaust systems, deciding on rebuilding versus period-correct replacement, and planning for pistons, rings, bearings, gaskets, seals, timing components, torque specs, and routine machine shop work. For bodywork restoration and repair, assess rust and prior repairs, decide between in-place repair or panel replacement, and choose methods such as sandblasting or chemical stripping, rust encapsulation, proper filler, block-sand, and priming, then select an era-appropriate paint. Document everything with photos, maintain a parts map, and consider mentorship or a formal class if you’re new to classic car restoration. Align these steps with your goals and budget to keep the project on track toward a reliable classic car restoration.
| Phase | Focus | Key Points |
|---|---|---|
| Step 1: Define goals & budget | Goals, scope, and budgeting | – Set clear project goals ( concours-quality, practical driver, or showpiece). – Define scope and labor mix (DIY vs. shop). – Draft a realistic budget for parts, fluids, paint, tools, and labor; build a contingency fund for hidden issues like rust or frame work. – A clear goal helps prevent scope creep. |
| Step 2: Research, planning, and documentation | Planning & information gathering | – Gather factory manuals, service sheets, and period brochures. – Study restoration precedents and common problem areas. – Create a phased plan with disassembly, mechanical, bodywork, paint, interior, and reassembly timelines. – Document everything with photos, notes, and labeled diagrams to aid parts sourcing and communication. |
| Step 3: Workspace, safety, and essential tools | Workspace setup & safety | – Maintain a well-lit, ventilated workspace with a sturdy bench and secure storage. – Use safety gear: eye protection, gloves, respirators, and a first-aid kit. – Build a core tool set (metric/SAE wrenches, torque wrench, pliers, screwdrivers, etc.) and plan to add specialty items as needed. – A prepared workspace speeds progress and reduces risk. |
| Step 4: Disassembly, labeling, and photography | Documentation during teardown | – Take extensive photos from multiple angles before removing parts. – Label wiring, hoses, and fasteners; keep removed parts organized. – Create a parts map and storage system for easy reassembly. – Detailed documentation reduces reassembly errors and helps you track component differences. |
| Step 5: Mechanical restoration—engine, transmission, and brakes | Mechanical restoration plan | – Assess engine, cooling, fuel, ignition, and exhaust. – Decide between rebuilding, short-block replacement, or period-correct substitutes. – Plan for parts like pistons, rings, gaskets, seals, and timing components. – Inspect braking system, suspension, steering, and drivetrain; budget for machine shop work and torque specs; document clearances for reassembly. |
| Step 6: Bodywork and paint—bringing the exterior back to life | Bodywork & finish decisions | – Assess rust and prior bodywork; decide on in-place repair vs panel replacement. – Strip and prime; apply filler, block-sand for straight surfaces, and priming. – Choose era-appropriate color and finish; decide between professional or garage-based results. – A proper body restoration is a major visual pillar of the final build. |
| Step 7: Electrical systems, interior, and wiring | Wiring & interior restoration | – Map wiring harnesses, label circuits, and test lights/gauges. – Replace or repair wiring as needed; ensure insulation stability. – Reupholster seats and renew dashboards and trim with period-appropriate materials. – A reliable electrical system complements interior aesthetics for an authentic restoration. |
| Step 8: Reassembly, testing, and alignment | Reassembly & validation | – Reinstall components methodically; re-torque fasteners to spec and verify gaskets/clearances. – Perform break-in, test brakes, steering, and suspension, then align wheels and balance tires. – Road-test in a controlled environment and document issues for correction. – Ensures reliability and safety before completion. |
| Step 9: Maintenance, care, and long-term goals | Ongoing care & governance | – Establish a maintenance plan with regular inspections and fluid changes. – Store the car climate-controlled if possible and keep service history. – Maintain detailed records to support future upgrades and preserve value. – Ongoing care keeps the restored vehicle reliable and enjoyable for years. |
| Common pitfalls and practical tips for beginners | Practical guidance | – Unrealistic timelines: build buffer time into your plan. – Budget creep: maintain a reserve and document costs. – Parts sourcing challenges: consider compatible substitutes or aftermarket options with period-correct fit. – Documentation gaps: photograph and label everything. – Skill gaps: start with easier tasks and seek mentorship or courses for more complex work. |
Summary
Conclusion